Wednesday, October 18, 2017

Why I both hate and love the swagger-ui?

This post is a critique on swagger-ui and a specific react/redux pattern implemented over there.

Before you proceed, you may need to have some knowledge of the following:

  • React/Redux
  • Swagger UI
  • Open API Specification, Loopback

OAS v3.0 (Open API Specification) is out. I was thinking of writing this post long ago when OAS was still 2.0. Now that team is probably migrating to support the latest specification. However, the scene at present is that most frameworks like loopback, still generate swagger.json as per OAS v2.0. Therefore the exercises I am about to show you might still convey the point.

The most negative aspect that sticks out is that the UI is simply too slow for large datasets.

Why? 

Because of the following line of code and what follows:

let taggedOps = specSelectors.taggedOperations()

Link

This is actually a very complex array-reduce operation. It is very well abstracted in this line, but bear with me. The initial load of the page (with the api info populated) is slowed down by the aforesaid operation. That is the slowness for the initial loading. But there is another aspect of its slowness.

React Reconciliation Process

The other cause for slowdown is react's reconciliation process which becomes apparent for large datasets. Any change in the redux state, triggers this reconciliation. React will do what its designed for - diff the current dom state with the virtual dom and only change those parts which have changed.

Sometimes the UI would freeze when you, say, toggle a tag. (A tag is synonymous to a model or a table in a database. All basic CRUD operations of that model will be grouped under that tag). With React, I believe the DOM manipulations are minimal - only the stuff that is changed changes. It is the diff computation that turns out to be expensive; and you cannot avoid it. Normally.

There are strategies to avoid it. One way to do so is that, we maintain the tag as a traditional react component which is disconnected from the redux store. Enough said. This is all theory. You probably want to manually verify this.
There are two ways about it.


  1. If you have some service that generates the swagger.json (and webserver allows for CORS) you can plug that in directly to the petstore app and preview your apis. You will need a large swagger.json for this to convince yourself.
  2. If you don't have a large dataset you can generate one using oeCloud. And then use the swagger.json generated there, in the petstore app for experimentation. 
I am going to follow the 2nd approach.

oeCloud is a loopback based framework which is geared to build enterprise grade applications. Its takes an API-first approach for fleshing everything out. On top of loopback, it supports personalization, eventual consistency, dynamic model creation or runtime model authoring, etc.

 Installing oe-cloud is simple: https://github.com/EdgeVerve/oe-cloud#install-this-node-module

(Make sure you have the prereqs)

 Post installation you might want to run the following two commands in succession in the project directory:
$ node . -m
$ node .


 The first command establishes some models required by the oecloud framework. The second command starts the server. You might see a message saying 'Browse your REST API at http://localhost:3000/explorer'

Note: make sure your port 3000 is available for this to work right away. You can configure this though.

Step 1 - Loading your API in petstore

What we want from oe-cloud is the following url:

http://localhost:3000/explorer/swagger.json 

Next we visit the petstore swagger app. Plug this url in the petstore app.

Step 2 - Observing the slowness 

Come down to ModelDefinition part - the first operation is a POST. Click it.

Notice that there was a slight freeze in UI responsiveness between that click and the subsequent UI state.

Alternatively we can do this in the developer console. (Just redo step 1, and continue with the following line).

In the developer console type:

ui.layoutActions.show(['operations','ModelDefinition', 'ModelDefinition_create'], true) 

...and hit Enter. This will do the same effect as above. We can see the delay either way. You may probably want to dig deeper at this point. But a fair warning, the code base isn't friendly for those who are not initiated to react/redux.

But what does swagger-ui do right? 

Yes, the slowness is a bum. But I had the opportunity to work with that code base and learn a few patterns for structuring a react/redux project. It is mainly their plugin architecture.

  1. Swagger-UX relies on plugins for all the good stuff.

    This enables you to extend the swagger-ui application, write your own components, and make each component aware of the system. The "system" in this context is analogus to a mechanic's toolbox. As you write your own plugins you probably write your own components, some utility functions, etc. If you expose them they finally land in the toolbox. You can even re-use them in the react components you create and the pre-existing ones.

    The system has a factory method to load a component by its name. This is very useful for composing your react components.

  2. Better design of your application state

    Each stateplugin your end up writing can either wraps something of an exiting state, extends it, or, creates a new state branch. Each state branch you create has its own actions, reducers, and selectors. When the application bootstraps you have neat namespaces via which you can access them.

    For e.g. recall what was done in the browser console above. 
For oeCloud framework, we had taken this code base and adapted to our needs. We have added code to handle our specific authentication needs. We also tweaked some performance issues that were part of the original swagger-ui project. You can reach that project here.

Warning: there are some minor bugs at this moment. If you happen to come across one please to raise an issue over there. Remember the original project was modified for oeCloud specific use. It may not be able to execute your APIs properly. But we can guide you nonetheless.

Links:


  1. Petsore - http://petstore.swagger.io
  2. Swagger Ui - https://github.com/swagger-api/swagger-ui
  3. oeCloud framework - website, github - https://oecloud.iohttps://github.com/EdgeVerve/oe-cloud
  4. oe-swagger-ui - https://github.com/EdgeVerve/oe-swagger-ui


Saturday, July 22, 2017

VM networking with VirtualBox on Ubuntu

Last week just finished an awesome training session on docker. Granted our corporate networks were sort of a hurdle for the training. But VirtualBox enabled us to carry on with the training. So I went home and installed virtualbox on my ubuntu machine; created a few VMs and thought I could get them networking. To my dismay I couldn’t get my host to talk to any of my guest virtual machines…

So I tinkered around and finally narrowed down the minimal stuff you need to do.

Here are some assumptions before going forward:
  1. You have a freshly installed virtualbox in ubuntu
  2. You have gone ahead with the creation of two (or more) virtual machines. Ultimately you need two to start with. Whether you have cloned virtual machines or created from scratch is irrelevant.
  3. You have at least tried to ssh from your host machine to the guest. So the assumption is that you have installed some ssh server on the guest machine.
  4. (This may not be necessary) You may have tried adding another network adapter - a host-only adapter, but you find that you cannot set the adapter name.

Scope of this post

I am only going to show you networking between the host and the guest machine. These steps should enable guest-to-guest networking in the host. Now if inside a VM you can’t connect to the internet…I can’t help you there. So hoping that is not the case.

Further, this post only deals with plain host to guest networking and vice versa. It does not cover how you can make those guest machines participate in the host VLAN network. In other words, it does not cover networking between other hosts in the same VLAN network as our specific host, with these guest machines.

Getting started

1. Setting up the host-only adapter.

Chances are you need to explicitly setup this one.

1.1 Finding the host network interface

You need to do this on your host and the guest machine.

Type the following

ls /sys/class/net

This will list the interfaces on your machine. Its a good idea to do this on both machines. However, on the host machine, this helps us in figuring out whether virtualbox has created a network interface for you. Suppose your host gave you an output like follows:

$ ls /sys/class/net
docker0  eth0  lo  wlan0

It probably means VirtualBox isn’t running…
…OR…
VirtualBox hasn’t created a network interface for you.

If latter is the case, you can re-verify this (assumption #4)

If however, virtualbox is running and you see an entry like vboxnet0 - I guess you are okay and you can skip the next step

1.2 Setting up the VirtualBox network interface.

This is fairly simple. Follow the steps given here -> https://askubuntu.com/a/198467/1123

2. Setting up an extra network adapter for your virtual machine.

We need a way to tell VirtualBox to setup an interface for our virtual machine. VirtualBox will give it a unique IP address via which you can at least begin to ping the guest machine. But this is not so straight forward.

Make sure you have powered-off your VM.

(While you are at it, you can also verify with exercise 1.1 for the host - if there is no network interface - you are in a big soup)

Follow the steps here to add the extra network adapter -> http://deostroll-developer.blogspot.com/2017/07/how-to-add-new-network-adapter-to.html

After this boot into your VM (in shell) and login as root

Hopefully based on the VM you are using there is probably a command to list the “active” network interfaces - Say if you are using ubuntu its ifconfig; if its a pure debian based os its ip address.

Go ahead and try the command out.

Note, the emphasis is on “active”. Your OS will detect your network interfaces, but won’t activate all of them. In other words, you can list the set of interfaces your OS is aware of. But you have to take the additional effort of activating them.

How to list all the network interfaces? See exercise 1.1

3. Activating the VM network interface in the guest

So you are inside your VM.

(Just for the heck of it. Simply verify exercise 2 was done correctly, that means carry out exercise 1.1 for the guest machine).

So the output of exercise 1.1 (on the guest) looks like this:

$ ls /sys/class/net
eth0 eth1 lo

Listing active interfaces (ifconfig) will probably have a private ip for eth0. There won’t be an entry for eth1. Here is how to set it:

Using a text editor like vi or nano, edit the /etc/network/interfaces file append the following lines to the file

# this is the secondary interface
auto eth1
iface eth1 inet dhcp

Now type

$ ifup eth1

If all goes well you will see and output the last line of which says you’ve obtained a lease of an ip address.

Verify again with command to list active network iterfaces

$ ifconfig
eth0      Link encap:Ethernet  HWaddr 08:00:27:91:02:83  
          inet addr:10.0.2.15  Bcast:0.0.0.0  Mask:255.255.255.0
          inet6 addr: fe80::a00:27ff:fe91:283/64 Scope:Link
          UP BROADCAST RUNNING MULTICAST  MTU:1500  Metric:1
          RX packets:0 errors:0 dropped:0 overruns:0 frame:0
          TX packets:0 errors:0 dropped:0 overruns:0 carrier:0
          collisions:0 txqueuelen:1000 
          RX bytes:0 (0.0 B)  TX bytes:0 (0.0 B)

eth1      Link encap:Ethernet  HWaddr 08:00:27:70:A2:B5  
          inet addr:192.168.56.102  Bcast:0.0.0.0  Mask:255.255.255.0
          inet6 addr: fe80::a00:27ff:fe70:a2b5/64 Scope:Link
          UP BROADCAST RUNNING MULTICAST  MTU:1500  Metric:1
          RX packets:0 errors:0 dropped:0 overruns:0 frame:0
          TX packets:0 errors:0 dropped:0 overruns:0 carrier:0
          collisions:0 txqueuelen:1000 
          RX bytes:0 (0.0 B)  TX bytes:0 (0.0 B)

lo        Link encap:Local Loopback  
          inet addr:127.0.0.1  Mask:255.0.0.0
          inet6 addr: ::1/128 Scope:Host
          UP LOOPBACK RUNNING  MTU:65536  Metric:1
          RX packets:0 errors:0 dropped:0 overruns:0 frame:0
          TX packets:0 errors:0 dropped:0 overruns:0 carrier:0
          collisions:0 txqueuelen:1 
          RX bytes:0 (0.0 B)  TX bytes:0 (0.0 B)

At this point, from the host you should be able to ping the guest machine. You can do a similar set of exercises for the other VM, and then ping the 2nd VM from the first one. But that is left to you as homework.

Hope this article helps you getting started with networking. Now you are hopefully ready to experiment with docker swarm at least.

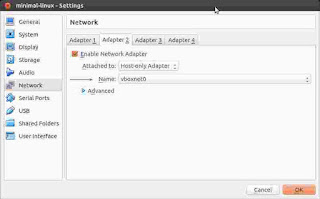
How to add a new network adapter to an existing VM (Oracle VirtualBox)

This same post is available here -> http://imgur.com/a/4FRET

If for what ever reason you cannot access the above, continue reading this post.

This post is only meant to supplement this post.

Step 1: open the settings dialog for your VM

Step 2 : go to the network option in the sidebar - click on the Adapter 2 tab

Step 3: on the adapter 2 tab, notice that the UI is disabled. We have to check the checkbox to specify this adapter


step 4: after you've done so we have to specify a value for "Attached to:" - Select "Host only Adapter" here

Step 5: Select a value for the "Name" select field. Notice it says vboxnet0 - that is the default. That is it. Click OK and you are done. Now power-on your VM and verify if the adapter is detectable by your OS
 

Thursday, February 2, 2017

learn programming (or to become a programmer)

Programming is an interesting exercise. Sometimes at work, I discover a problem. And a good chunk of my time goes into figuring out a solution to fix it. When I discover a challenge in the piece of code I am writing or the solution I am implementing, it becomes more exciting.

But programming isn't everyone's cup of tea. There are good many articles and forum posts which say what the programming profession is and if programming is the right job for you. Here are few links to that effect:
  1. http://www.makeuseof.com/tag/6-signs-meant-programmer/
  2. https://www.theguardian.com/info/developer-blog/2011/oct/07/programming-developer-journalist
  3. https://www.youtube.com/watch?v=0MJUpEkxteE

I highly recommend you continue reading this post after visiting the above links.

Here are some less-mentioned guides about how to go about learning programming:

1. The more you realize what a computer actually is, the more comfortable you might be with learning how to write programs. Its not really writing code or compiling programs...it more of figuring out the answer to why write programs?

2. It also helps to think of a computer as an IO (input/output) machine. It is designed to accept certain kinds of input, do some processing and calculations, and output to a set of destinations. The most common of destinations is a computer terminal (or a computer monitor).

3. Get a general sense of how software works? Is it interactive? Does it require human interaction? If the software does not need human interaction, and it works, how the hell does it work?

4. Its not about a language, or the best language. The language is only a vehicle for you to get programming. The language alone doesn't tell the computer what to do. But it is important to figure out what the computer is capable of...and how that language can achieve all that. Step 3 is sort of important here. As you do this, you slowly figure out how a computer actually works.

Now if all this sounds like something you are not bound to like...then don't get into programming. Its not your thing. There are loads of other career choices to make - it need not have to be related with what you studied in college. But it has to be something you enjoy doing.


If you are a novice programmer probably the best place to get started might be
CodeAcademy. Most of the programming languages come with a developer environment (or an IDE). Here you can learn any language without that hassle. If you are just starting out, keep the next thing as a to-do item at the back of your mind...probably when you achieve a certain level of proficiency writing simple programs you can have a go at this: find an answer to what makes a web application different from a desktop application?

All the best.

Tuesday, January 3, 2017

konva js - a fork of kineticjs - a javascript 2d graphics/animation library

I've been exploring KonvaJs for a while. And I like it. I've done some pretty awesome animations using this library too.

https://plus.google.com/+ArunJayapal/posts/BRqib53sHK6
http://jsbin.com/fulujeceti/1/edit?js,output

The more you use the library, the more you'd want to make a custom shape. And there is a solution for that. However, that talks about manually drawing shapes using the 2d canvas primitives. But, you'd also want to re-use what is already offered by the library. Konva docs currently don't have a say about how to do this.

I may have found a hack. It may not be elegant when you think it. But it will do...

Here is my git repo if you are interested in code for an example.

https://github.com/deostroll/konva-graph-generator

Ps: you'll need npm and gulp to run it.