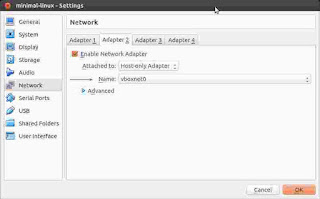
So I tinkered around and finally narrowed down the minimal stuff you need to do.
Here are some assumptions before going forward:
- You have a freshly installed virtualbox in ubuntu
- You have gone ahead with the creation of two (or more) virtual machines. Ultimately you need two to start with. Whether you have cloned virtual machines or created from scratch is irrelevant.
- You have at least tried to ssh from your host machine to the guest. So the assumption is that you have installed some ssh server on the guest machine.
- (This may not be necessary) You may have tried adding another network adapter - a host-only adapter, but you find that you cannot set the adapter name.
Scope of this post
I am only going to show you networking between the host and the guest machine. These steps should enable guest-to-guest networking in the host. Now if inside a VM you can’t connect to the internet…I can’t help you there. So hoping that is not the case.Further, this post only deals with plain host to guest networking and vice versa. It does not cover how you can make those guest machines participate in the host VLAN network. In other words, it does not cover networking between other hosts in the same VLAN network as our specific host, with these guest machines.
Getting started
1. Setting up the host-only adapter.
Chances are you need to explicitly setup this one.1.1 Finding the host network interface
You need to do this on your host and the guest machine.Type the following
ls /sys/class/net
This will list the interfaces on your machine. Its a good idea to do this on both machines. However, on the host machine, this helps us in figuring out whether virtualbox has created a network interface for you. Suppose your host gave you an output like follows:
$ ls /sys/class/net
docker0  eth0  lo  wlan0
It probably means VirtualBox isn’t running…
…OR…
VirtualBox hasn’t created a network interface for you.
If latter is the case, you can re-verify this (assumption #4)
If however, virtualbox is running and you see an entry like
vboxnet0 - I guess you are okay and you can skip the next step1.2 Setting up the VirtualBox network interface.
This is fairly simple. Follow the steps given here -> https://askubuntu.com/a/198467/11232. Setting up an extra network adapter for your virtual machine.
We need a way to tell VirtualBox to setup an interface for our virtual machine. VirtualBox will give it a unique IP address via which you can at least begin to ping the guest machine. But this is not so straight forward.Make sure you have powered-off your VM.
(While you are at it, you can also verify with exercise 1.1 for the host - if there is no network interface - you are in a big soup)
Follow the steps here to add the extra network adapter -> http://deostroll-developer.blogspot.com/2017/07/how-to-add-new-network-adapter-to.html
After this boot into your VM (in shell) and login as
rootHopefully based on the VM you are using there is probably a command to list the “active” network interfaces - Say if you are using ubuntu its ifconfig; if its a pure debian based os its ip address.
Go ahead and try the command out.
Note, the emphasis is on “active”. Your OS will detect your network interfaces, but won’t activate all of them. In other words, you can list the set of interfaces your OS is aware of. But you have to take the additional effort of activating them.
How to list all the network interfaces? See exercise 1.1
3. Activating the VM network interface in the guest
So you are inside your VM.(Just for the heck of it. Simply verify exercise 2 was done correctly, that means carry out exercise 1.1 for the guest machine).
So the output of exercise 1.1 (on the guest) looks like this:
$ ls /sys/class/net
eth0 eth1 lo
Listing active interfaces (
ifconfig) will probably have a private ip for eth0. There won’t be an entry for eth1. Here is how to set it:Using a text editor like vi or nano, edit the
/etc/network/interfaces file append the following lines to the file# this is the secondary interface
auto eth1
iface eth1 inet dhcp
Now type
$ ifup eth1
If all goes well you will see and output the last line of which says you’ve obtained a lease of an ip address.
Verify again with command to list active network iterfaces
$ ifconfig
eth0      Link encap:Ethernet  HWaddr 08:00:27:91:02:83
          inet addr:10.0.2.15  Bcast:0.0.0.0  Mask:255.255.255.0
          inet6 addr: fe80::a00:27ff:fe91:283/64 Scope:Link
          UP BROADCAST RUNNING MULTICAST  MTU:1500  Metric:1
          RX packets:0 errors:0 dropped:0 overruns:0 frame:0
          TX packets:0 errors:0 dropped:0 overruns:0 carrier:0
          collisions:0 txqueuelen:1000
          RX bytes:0 (0.0 B)  TX bytes:0 (0.0 B)

eth1      Link encap:Ethernet  HWaddr 08:00:27:70:A2:B5
          inet addr:192.168.56.102  Bcast:0.0.0.0  Mask:255.255.255.0
          inet6 addr: fe80::a00:27ff:fe70:a2b5/64 Scope:Link
          UP BROADCAST RUNNING MULTICAST  MTU:1500  Metric:1
          RX packets:0 errors:0 dropped:0 overruns:0 frame:0
          TX packets:0 errors:0 dropped:0 overruns:0 carrier:0
          collisions:0 txqueuelen:1000
          RX bytes:0 (0.0 B)  TX bytes:0 (0.0 B)

lo        Link encap:Local Loopback
          inet addr:127.0.0.1  Mask:255.0.0.0
          inet6 addr: ::1/128 Scope:Host
          UP LOOPBACK RUNNING  MTU:65536  Metric:1
          RX packets:0 errors:0 dropped:0 overruns:0 frame:0
          TX packets:0 errors:0 dropped:0 overruns:0 carrier:0
          collisions:0 txqueuelen:1
          RX bytes:0 (0.0 B)  TX bytes:0 (0.0 B)
At this point, from the host you should be able to ping the guest machine. You can do a similar set of exercises for the other VM, and then ping the 2nd VM from the first one. But that is left to you as homework.
Hope this article helps you getting started with networking. Now you are hopefully ready to experiment with docker swarm at least.


