Saturday, October 10, 2020

The era of faceless conversations - an essay

Disclaimer: This blog of mine hasn't featured essays before.

If you are reading this you are in a sense having a clumsy conversation with me. Actually, its more of a monologue. You don't know me, nor I you. We'll probably never meet. And, if we do, I will leave that to fate.

But it is a little scary to meet someone this way. At least for someone like me; although I am in my mid 30s. But in today's world this same fear has been twisted into a business model - think online dating, or, matrimonial services. This anxiety is both good and bad. In some way and to some degree, it is committed to every individual’s well-being. A mother might tell her young daughter not to talk to strangers, or, stay away from that shady family uncle; otherwise you could get kidnapped, or, worse, molested! Would the young daughter feel nervous when that person is around? Your teenage friend might persuade you to express your feeling to the one your heart skip's a beat for. And if you are earnestly going to express them, won't you be a little nervous?!

This anxiety is universal and normal human behavior.

Now, you may have imagined people to fit those fictional characters and scenarios I wrote earlier. Adults of this generation can easily relate to it. Now I implore you to imagine those same characters in a more modern context. Imagine those same conversations over a phone, or, a video call.

Will the experience be the same?

What about the anxiety? Is the stranger over the phone or email, an immediate potential threat? Now that your teenage friend, has encouraged you...how would you have proposed? Emojis? Friend Request? What then? Observed and scrutinized all your crush's pics! Tried to find out where the crush hangs out so you can be closer to the person; there is a chance the two of you meet face-to-face?

We are not as confronting as our previous generations would have been. Is this not some “thing” that should be responsibly taught in schools?

We can all agree some "thing" is different? Shall I label the way we have conversations today as "faceless"? Most of the time we are not really confronting the person. Is it good or bad? What exactly transpired over the years? Can I call that "civilization"?

We have many mortals to thank for this revolution in the way we humans communicate. We also have many hard humanity facts to curse about. 

Civilization. Had I omitted this word; would you have given some thought to this?

But I must divert your attention to a more pressing and related matter - having arguments on this faceless internet. It sounds a little silly on a relative scale. But we all take the liberty to assume that there is an intelligible person at the other end. That mortal is masked under a pseudonym we software developers fondly call a "username". 

The idea behind facelessness is not a novel idea. It probably has been mentioned and debated many times. In fact, I may even be plagiarizing someone's TED talk or movie here. Facelessness has existed long before modern forums like HN (Hacker News), Reddit, 9Gag, (or, the gamut of similar other services) existed. But it has bought about an explosion in the way we communicate. This explosion is a sign of progression; it is healthy. But such “progress” will typically have its own set of problems. 

Today we are talking to strangers; arguing with them. We are not quick to research that user; we don't take the time to write a bio perhaps; we are quick to respond/react. No concern for which part of the world the OP is. We probably won't even do an age verification. Tomorrow, a social media platform (the likes of Facebook, or Twitter, etc) may insist we be over 18. Its easy to fake things such as our age/gender on the internet. Others, are there for the icing on the cakes (aka upvotes, likes, appreciations, or even silently observing the drama). This relative facelessness is now becoming degenerative. There are flame posts, shit posts, and, people with the soul purpose of maligning others. People are exiting forums, expressing fatigue of arguing with the OP; quitting Facebook, Instagram or Twitter...or several other services. Perhaps even an online banking platform, after becoming dissatisfied at the customer service and bank policy.

It is quite unlike a politician walking out on national television after a heated inconclusive debate. The politician might have lost hope at humanity. Perhaps that is the illusion he or she wants to create. It is a drama tactic to raise support from the people. (The faceless television viewers). But, let us assume it has gone really bad for that politician - he or she has completely lost faith in humanity. Then in all probability he or she is walking back to the kingdom of humanity where there are others to help him or her out of that abject emotional state. His/her own family perhaps.

Can you say the same for our mortal user who has just done the same thing? What drama tactic just transpired? What insane kingdom would he or she have wandered off too? Can you pull the person back to the real world? Would you? The faceless You?

Now imagine, somebody knocking at your door. Some unfamiliar foreign couple hands you a photo of their 15 or 16-year-old child…with tears. Will you think, was that "argument" really worth?

Oh, faceless You.

Saturday, August 22, 2020

Getting started with IoT projects - part 3

Hello world

This post is part of a 3-part series.

Part 1 (here)
Part 2 (here)
Part 3 (this post)

Now that all the tinkering/research is done, you have to work towards your goal. But its absolutely okay if you do not reach this phase. As I said, the previous phase is the most enjoyable. But satisfying your project goal might present several challenges. And if executed with a proper plan in sight, it can be rewarding.

To this end you might need to do one or more things like:

Miniaturizing your project
Plan on how to install it
Enclosing it in a box
3d printing
making a custom printed circuit board
and, many more things.

All of these just transcend the IoT domain, but a project may be seldom complete, without them. But there are parts of the above "processes" I find enjoyable

1. Arranging things on a perforated board


This is really an art. The challenge here is arranging stuff in a confined area. You don't want to overlap  connections, and, still manage to keep all the components in that confined area. The area is usually defined by where you plan to finally install your project. It is further defined by giving clearances for installing screws, spacers, etc. 

However, this is not something a beginner should definitely dive into. It takes a lot of spatial thinking and imagination, and, practice. You could do this in software like kicad. But it will give you a rough idea only. The process is similar to designing printed circuit boards, but still not exactly the same.

 2. Soldering stuff onto a perforated board.


Frankly I don't enjoy this as much as I love prototyping. This is neck breaking. You may need a lot of soldering skills here. There are tricks I learned along the way. I generally find threading copper wires (0.4 mm to 0.6 mm) (non-enameled ones) wire useful. You can bend the wires, thread them through the perforations, so they run through the top side of the board, and thread them back, to reach a terminal of another component on the underside. The wires can be bent also to remain in the confines. And, when all else fails. I take a normal insulated copper wire and try to connect the remaining terminals. But the main challenge for me is soldering all of them. 

I use a lot of blu-tacks or re-usable mold-able adhesive (such as this or this) to fasten the copper wires if I need to join them to a terminal by soldering.

3. Mastering how to solder


Even today, this is something I am not proud to talk about. It takes a lot of practice, and, finger burns, and perhaps singing your friend's body parts too❗ There are a lot of videos to on how to solder various stuff. It may or may not give you confidence. It better to start off with this in the prototyping phase itself if you really anticipate doing this. 

You can get boards such as the wemos whose headers are normally not soldered. The wemos is relatively costly. You either learn soldering or brick the wemos. That is the hard-and-fast way.

4. Being complacent and shabby ✌


You may have to be complacent with whatever works for you. If you want to be shabby about the final look, there is nothing wrong. And I firmly believe that that captures the spirit of tinkering and IoT.

However for safety and security concerns you will most probably vie extra things such as mentioned before. But each of those deserves their own writeup. 

You may have to compromise a lot sometimes. For e.g. Say you have prototyped a way to automate your light/fan via wifi; you can now toggle your light via your mobile phone. But you may decide to keep it out of sight. The next choice is try to install inside the switch board. It might be a shock when you find that it doesn't fit. You will have to either scrap the project, redo, or, compromise - perhaps install it close to the switchboard by making a provision of running the wires out of the switchboard...and finally attract more eyes. 👀

Expect other people getting surprised or quizzical


As far as the above project is concerned, your spouse or mother or guardian might quizzically frown upon you when open up your switchboard and stare at it for no apparent reason. But remember, that just you, celebrating the IoT life...But be careful not to loose it to electrocution due to AC mains‼

Conclusion


There are a plethora I haven't mentioned like: 

devices talking to the cloud
communication protocols
sensors, analog, digital,
kicad, pcb etching, freecad,
etc, etc.

I can actually make a word cloud art out of it. 🤔 And that has to be your expectation moving forward. 

What we know is a drop. What's out there is an ocean.

Getting started with IoT projects - part 2

Hello world

This post is part of a 3-part series.

Part 1 (here)
Part 2 (this post)
Part 3 (here)

Here is advice that can get your started.

1. Think of a project


It can be anything. But let it solve some personal need.

For e.g. a door alarm, automating lights/ceiling fan in a room, etc.

It can be something for your car also. Just fix on something useful to you.

2. YouTube for it.


Search youtube. Enter keywords related to your goal. Along with those keywords add any popular board - like raspberry pi, arduino, etc. (or even the board you intend to work with).

You may be fascinated at realizing other people have already done it. Watching other people do stuff, (regardless of whether it is related to your project goal or not), will improve your confidence. You will come across other components and new concepts. This is how you learn about IoT, your first steps.

And it also prepares you for the next phase - buying stuff.

You can research more. But not recommended right away. Many components will have a part number and a specifications document. It's never welcoming to read them. But know that they exist. It can help when it's time to troubleshoot components.

3. Buying


There are many ways you can purchase stuff. Whatever the approach, it pays well if you make a well informed choice. So like a healthy consumer, do proper pre-purchase research. Look at reviews/comments/ratings. Re-watch those youtube videos if you have to.

And once you have finally obtained the product. Share your feedback through the channels provided. For e.g. if its amazon you are buying through, review the product with pics, and, videos. If it's a shop you got it from, make a video review and put it on your youtube channel - share it in a social forum where you can network with other IoT developers/creators.

You will end up with faulty products. Don't let that get to you. Your most creative and illustrative post-delivery review or feedback will help others not fall into that nasty surprise trap.

If its devices like sensors you are buying provided that they are cheap, then consider buying more than one. So if you happen to break/brick one, hopefully you have realized your mistake, and not waste time waiting for a replacement to be delivered.

If I am on a budget, China markets look enticing. I used to procure things from Aliexpress, and, Bangood at one point of time. But traditional ecommerce problems/pains still apply here. Do your due diligence. (Always make the informed choice). However if you have purchased, the delivery might run into months sometime. Sometimes they don't reach you. Many of "our kind" has lost money due to this. 😢

For your first project however, don't consider procuring through foreign ecommerce sites. Relationship between China and India has become complicated these days. It might become complicated for other countries too. And the ongoing pandemic just makes matters worse. 

But this pandemic also gives domestic ecommerce deliveries, a bad experience. Just know "delays" are inevitable, and, they will one day slap your face...Don't let it discourage you.

3. Tinkering/Prototyping


So once you have got your hands on all the things you need. You can prototype on a breadboard. The following things help

Connection diagrams
A multimeter
Pictures/videos of the breadboard with stuff connected - working or failing

I don't have to stress how that's important.

This is the best part, for me at least.

But there are hazards too. Like for e.g. working off AC mains. Take proper precautions. Before testing out with live electricity see that your wires don't short.

Getting started with IoT projects

Hello world

This post is part of a 3-part series. 

Part 1 (this post)
Part 2 (here)
Part 3 (here)

In my last post I suggested on how to start off with an IoT project. I realize that that post is quite insufficient. Even googling today, I didn't find an article that would better equip you. That might not be the case in the future. Anyway, I thought it best I write some advice based on how I got started. 

Remember these are just my thoughts...


For the absolute beginner


My first advice would be start off with a project for your home. Doing a "hands-on" ASAP is the best approach.

There are books out there. Considering my initial advice, I feel books are silly. But I did find one book useful:

Make Electronics (https://amzn.to/2CNrMgB)

(I might update this section if I come across more books)

There are also various starter kits available. But once you buy and stare at them you might experience bull-in-a-china-shop syndrome; except, (in all probability) you are not in a shop. You might not know what to do with it.

You need a lab/workspace


The idea here is, you don't want to be interrupted. You do not want to interrupt others. You may want to kid proof to some extent. Air and illumination should be in adequate supply. Access to a computer and/or AC mains is a plus.

A lack of such a space, in any way, should not discourage you. Just take extra precautions like cleaning up after your work.

Also have a fire extinguisher handy. You need not purchase it. For e.g. if you live in an apartment complex, there is probably a place where it is installed. Just know where to run to and grab it in case of fire...Be sure you grab one meant to douse electrical fires.

You need a toolbox (of sorts)


You need a set of tools to help you prototype and for troubleshooting.

Multimeter

Assorted components
Resistors
Capacitors
Transistors

Tools
Wire cutters
Tweezers
Soldering iron kit (with solder reel, stand, etc)

Wires
Jumpers - assorted (every combination of Male/female)
Hookup wires
Alligator wires

Power supply
Linear regulators
DC sources

Of course there are perforated boards, jewellery repair stand, etc. You do not need those now...

I have summarized this based on my experience so far, and also collating what I have seen from several IoT creators on YouTube. And this a minimal list. 

DO NOT BUY ALL AT ONCE. Make a fair judgement based on what your project needs and then procure.

If you happen to watch a lot of creator videos today they may have a lot of equipment. They are nice to have, but they can drain your budget. I am talking about oscilloscope, frequency generators, etc. For simple projects, you don't need those. Even if there are cheap versions of the same, look the other way...

The next part is advice you really need.

Thursday, July 23, 2020

Breadboard Internet Clock v1.2


More photos/videos here: https://photos.app.goo.gl/o8gtD6RszRP9zDCU9

There are several similar projects out there. I was inspired to do this for two reasons:
  1. A colleague of mine did it.
  2. I wanted to do something for the company IoT club
Okay, its not an IoT club per se; it is a “technology club” - called Technovators.

The wanting-to-do-something aspect also underlines these goals:
  • it should be something easy-to-do
  • (relatively) cheap
  • captures the spirit of makers or creators
That said, this is not a full out tutorial. Most of the what-is questions will not be answered here. And this tutorial is "not cheap"; but its not that expensive either. You can think of it as getting started...more about that specific topic in the conclusion.

What you need

  1. Breadboards (3 x 400 pt board)
  2. Jumper wires
  3. Resistors. Anything >= 150 ohm and <= 300 Ohm - 7 Nos - all same.
  4. Wemos d1 mini
  5. USB cable/charger
  6. A PC (For writing code + flashing)
  7. 4-digit 7 segment display - 0.56 inch, common anode
  8. Hookup wires. U-shaped.
I have used platform io for coding + flashing. You could very well do this using the Arduino IDE. Differences exist; so you are on your own there…

The 4-digit display can also come with a common cathode configuration. In this case, the wiring and coding will vary.

The wemos d1 mini is a wifi module board that has analog and gpio pins. It is mostly available with headers un-soldered. So its your responsibility to solder them.

For those uncomfortable with the soldering business, there is a version of this clock you can make with a similar module board - the nodemcu. It will be slightly different but, totally doable. There is a future plan to make one soon…
You probably can probably fit all this into a single 800 pt breadboard. And also do without the u-shaped hookup wires. I had slightly different objectives - “it should be a self-educational clock of sorts…” “should be wall mountable”…etc…etc…

Working principle


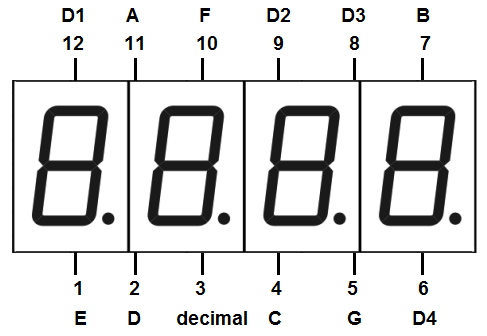
Assuming you have a display with a common anode configuration. Here is how the pinout diagram and internal schematic looks like:
Fig 1. Pinout diagram
Fig 2. Display Schematic
Fig 3. Segment naming scheme

To display a number we need to do the following:
  1. Where the digit (we want to display) should appear?
  2. In the appropriate digit location, what segments should appear.
  3. Ensure that only one segment lights up at a time
If you are tinkering, please connect a resistor to the segment pins (A to G) and 5V to anyone of the digit pins.
If you try to show up a number such as “1” with these constraints you cannot manually do it. However, the wemos is capable of doing this very fast. The net effect of such blazing fast toggling of the LED segments is the illusion that, they are always on.


Wiring Diagram Guide


The only guiding principle you’d ever need - a LED should always have a resistor of suitable value in series.


Breadboard wiring guide and mapping of pins.


Try to wire according to your convenience. Its not necessary to do it exactly as I have done it. Experiment with alternate placements and wiring. This will affect code.

As a general guide, study the various pinout of each module, make a note of what connects and where, and, then, arrive at the mapping. Then its only matter of editing the corresponding lines in code.


Editing and flashing code


Create a new project in platformio. Select the Wemos D1 R1 and mini (wemos) for the board.

Next, copy/paste code from here: https://github.com/deostroll/breadboard-wifi-clock/tree/master/wemos-d1-mini/ntp-clock-2

Files: main.cpp and platformio.ini

Assuming here that your pin mapping may be different.

After the breadboard wiring, make note of the connections between the display and wemos. Edit the code to reflect the pin mappings. To make job easier consider using the worksheet linked in code.

Once done, you need to update code to reflect your WiFi’s credentials.

For flashing code, you have to click on the Upload action: Click on the platformio icon, and find the action in the left sidebar.

This could take a few minutes.

That is it…

You should have a clock.

About the code assets shared


I am sharing the entire project on github. It includes code where I try out various libraries - for e.g. a timer, etc. The project you want is ntp-clock-2

Other projects exist. This was me just thinking and experimenting other libraries and hacking.

Conclusion


So is this a good getting started project for learning about IoT?

TL;DR - NOPE. Just start with something. Take it slow. Know it is hard to find like-minded people. Be eager to experiment, learn, and, reach out. 

The reason is simple. Most of the challenges involved in most personal projects simply go beyond arduinos or the esp8266, or the raspberry pi's, or, whatever (capable) devices (Smart devices, or, MCUs). The tutorials which you end up googling on the internet might cover specific areas which meet the primary objective. It cannot possibly cover everything...

And that is how tutorials should be - there is nothing wrong there!

Consider a washing machine at your house as an example. 

How can a program/software sense that the washing machine is idle? 

Most machines will sound a buzzer or an alarm. This is something our ears can notice. This is good, but not so much for software programs...Further, most products that are available on the consumer market are not specifically designed to interface to an external system such as a smart device or a computer. (The consumers today are mostly not IoT savvy 😏 ).

But, that mean, you have to always be there watching and listening to discern that specific state. You may want an alternate buzzer, probably installed in your living room, to make a sound to indicate that the washing machine is idle. 

So making a remote buzzer make a sound is only one part of the whole challenge. You might use your smart devices to facilitate that. And in fact, one can say that you are doing IoT there to some degree...However, you haven't completed your project! 

There is still the entire problem with actually sensing the idle state; how would you solve this?

Most arduino or rpi tutorials won't cover that bit to your satisfaction. But, if you look at it from this perspective - can we draw a silverline and assert that beyond that line you'd become an IoT expert?

Certainly NOT.

One cannot be an all-rounder in this field since it encompasses multiple disciplines and subjects. And with regards to this washing machine example - just leave a brief comment saying how YOU would solve it...

In the end, and if you are looking to get started with IoT, all I can say is, just start somewhere. Take up challenges - start small and gradually increase in complexity. The clock exercise is rather simple. It can get you started off. (Perhaps not this version, but stay tuned for the next version). 

It is not easy to find like minded people here, but that shouldn't discourage you. Be open to experimenting, and, sharing your successes, and, failures. Join a club. Participate in forums. Maybe perhaps publish your version of a getting started project...

I hope you find this journey as fulfilling as your next...

Tuesday, January 21, 2020

Did my browser file download complete?

I was downloading an ubuntu server image. So I opened google chrome browsed to https://releases.ubuntu.com and found the version I wanted. And I clicked the correct link and the browser download began...

The next thing you know, I am wondering when this would finish, and, how would I be notified once it has finished...?

And when my eyes laid on the MD5SUM file that sparked an idea. Its not a novel idea. But its kind of cool as long as the flame of self-pride has not yet extinguished at the apparent serendipity. Hence my reason for this quick and hasty write-up.

So if the file has an md5 hash, and you have a program that can verify a file against this hash, you are good.

Now all you need is a program that repeatedly checks for the file integrity.

You probably have known about md5sums from the old internet era (1990s) where internet connections where not so reliable or fast. These sums (or hashes) were a means to check for file integrity. Now you can use the same concept to ascertain if the file has completely downloaded.

Hopefully you understand where to use this properly as I am not going to go there. There are problems of the same pattern in various kinds environments that have equally scintillating solutions. If you choose to share your 2 cents on that ... please feel free to comment.

Good Day!!